- Because Macs don't have a Print Screen command like in Windows, most Mac beginners don't know how to take or delete screenshots on Mac with a keyboard shortcut.
- This task is actually fairly easy to achieve, and there are several ways to do it.
- This article will show you bunch of different ways to take and delete screenshots on a Mac.
Capturing a screenshot on your Mac can be a useful way to save important information or to share what is happening on your screen with others. In this article, we will provide step-by-step instructions on how to take a screenshot on your Mac and how to delete screenshots that you no longer need.
Whether you're new to Mac or simply want to brush up on your screenshot-taking skills, this guide will help you get started. We will also discuss useful tips and tricks for taking and managing screenshots on your Mac.
So if you're ready to learn how to take and delete screenshots on your Mac, read on to get started.
How to take a screenshot on Mac using screenshot keyboard shortcuts
macOS has built-in screenshot keyboard shortcuts for carrying out specific actions and system tasks. screenshot keyboard shortcuts allow you to increase the speed at which you work by a significant margin. To take a screenshot of your Mac screen, follow these steps:
Take a screenshot of the entire screen
To take a full-screen screenshot, press: Shift + Command + 3 on your keyboard.

Take a screenshot of a certain area
To screenshot a select area of your desktop screen using your mouse cursor, press: Shift + Command + 4 on your keyboard.

Take a screenshot of a window or website
To screenshot an opened window or website, press: Shift + Command + 4 + Space Bar on your keyboard.

You can also copy the screenshot to your clipboard so you can paste it into another program using these hotkeys:
Take and save a screenshot of the entire screen
To take a full-screen screenshot to clipboard, press: Shift + Command + 3 + Control on your keyboard.

Take and save a screenshot of a certain area
To screenshot a select area of your desktop screen using your mouse cursor and save the screenshot to clipboard, press: Shift + Command + 4 + Control on your keyboard.

Take and save a screenshot of a window or website
To screenshot an opened window or website and save the screenshot to clipboard, press: Shift + Command + 4 + Space Bar + Control on your keyboard.

Take a screenshot with the Screenshot App
For macOS Mojave or macOS Catalina, the screenshot utility app is equivalent to “Grab” in previous versions. It is a professional screenshot tool created by Apple that allows you to take high-quality screenshots. With Screenshot, you can capture screenshots of your desktop and also capture your workflow on screen.
You can find this application by searching for it in the Utilities folder within Applications, or by using Spotlight in the status bar or Launchpad.
To take a screenshot of your Mac screen using the macOS Screenshots app, follow these simple steps:
1. Open the Screenshot App
The quickest way to do this is to open Spotlight Search in the top-right corner of your menu bar.

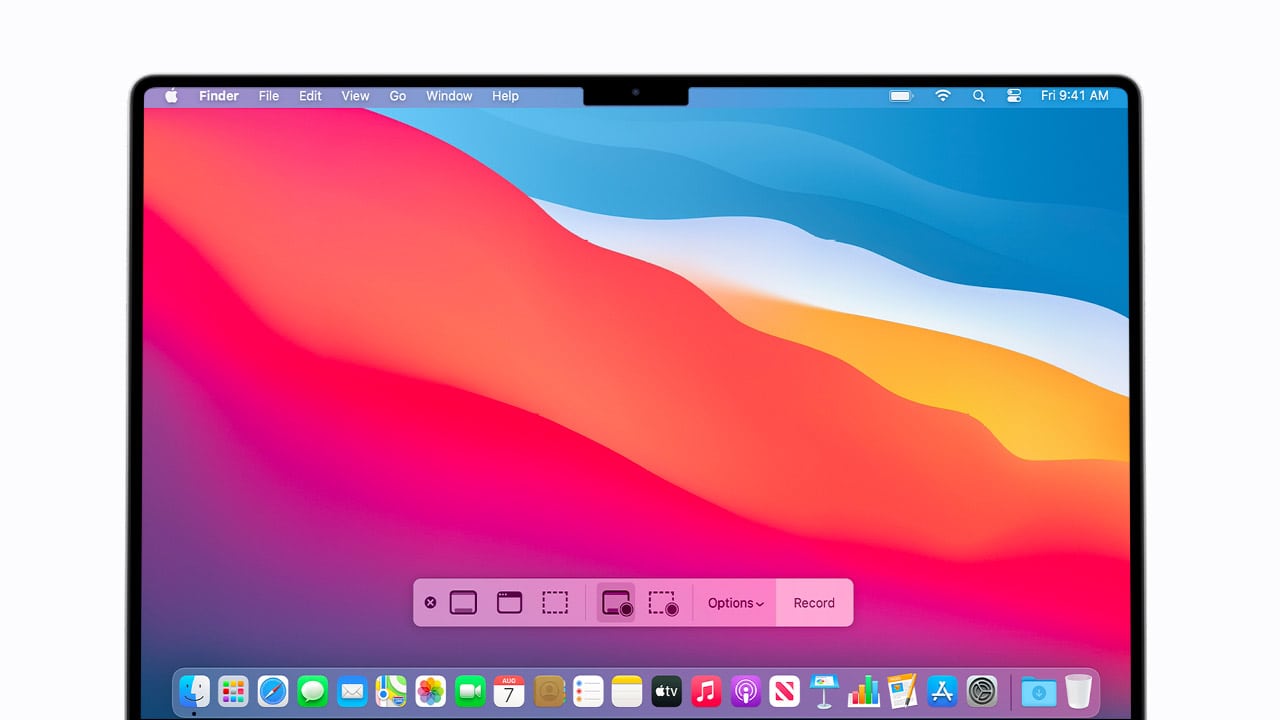
2. Choose the type of screenshot from the navigation bar
Once you launch the Screenshot App you will see a screenshot panel screen with icons which allows you to choose the type of screenshot you want to capture.
- The first option on the navigation bar is Capture Entire Screen, this option will capture everything displayed on your screen in a fullscreen screenshot.
- The second option on the navigation bar is Capture Selected Window, this option will let you choose a screen or window to take a screenshot.
- The third option on the navigation bar is Capture Selected Portion, this option will let you click and drag a window of any area of your screen to take a screenshot of selection.
You can also take timed screenshots. Click the options drop-down menu, you will see the timer section, choose either the 5 Seconds or 10 Seconds option and then click Capture. A countdown timer will appear on the screen. The screenshot will be made automatically.

Take a screen recordings with the Screenshot App
You can take a video screen recording with the Screenshot App. Follow these simple steps to do this.
1. Launch the Screenshot App
You can do this by clicking the Launchpad with your mouse button and then searching for Screenshot.
2. Choose the Type of Screen Recording from the Navigation Bar
- The first option is Record Entire Screen, this will create a video recording of the whole screen.
- The second option is Record Selected Portion, this will let you choose a selected area of the screen to record with a pop-out window.
- Once you are finished, choose Stop Screen Recording to save the video.
Please be aware that creating screen recordings will use a lot of disk space on your computer.
Our takeaway
In conclusion, taking and deleting screenshots on your Mac is a simple and convenient way to save or share information from your screen. By following the steps outlined in this article, you can quickly and easily take screenshots of your entire screen or specific areas and edit or delete them as needed. Additionally, you can customize the default screenshot save location to better suit your needs.
With these tips and tricks in hand, you can master the art of screenshot-taking on your Mac and make the most of this handy feature.
FAQs
How do I edit a screenshot on Mac?
You can edit the screenshots you take using the Preview App. If you don't capture the screenshot to clipboard you can open the individual photo and use the markup tools to make changes to the screenshot.
How do I take a screenshot on my Mac?
To take a screenshot on your Mac, press and hold the "Shift" key, the "Command" key, and the "3" key simultaneously. This will take a screenshot of your entire screen and save it to your desktop as a .png file.
How do I take a screenshot of a specific area on my Mac?
To take a screenshot of a specific area on your Mac, press and hold the "Shift" key, the "Command" key, and the "4" key simultaneously. This will allow you to select a specific area of your screen to capture. Once you have selected the area, the screenshot will be saved to your desktop as a .png file.
Can I edit my screenshots on my Mac?
Yes, you can edit your screenshots on your Mac using the built-in Preview app. To edit a screenshot, double-click on the screenshot file on your desktop to open it in Preview. From there, you can use the various tools in Preview to crop, annotate, or otherwise edit the screenshot as needed.
How do I delete a screenshot on my Mac?
To delete a screenshot on your Mac, simply find the screenshot file on your desktop and drag it to the trash can icon in the dock. Alternatively, you can right-click on the screenshot file and select "Move to Trash" from the menu.
Can I save my screenshots to a different location on my Mac?
Yes, you can save your screenshots to a different location on your Mac by changing the default screenshot save location. To do so, go to the "System Preferences" on your Mac, select "Keyboard" and then "Shortcuts". From there, select "Screenshots" and choose the folder where you want your screenshots to be saved.