Ever found yourself in a pickle trying to pair your Apple TV remote? You're not alone. It's a common issue that can be easily solved with the right steps.
In this guide, we'll walk you through the process of pairing your Apple TV remote. Whether it's your first time setting up or you're re-pairing after a hiccup, we've got you covered.
Understanding how to pair your Apple TV remote can be a game-changer. It's all about knowing the right buttons to press and when. So, let's dive in and get that remote up and running in no time.
Why Pairing an Apple TV Remote is Important
Your Apple TV remote's prime function is remote control. But, without proper pairing, this device loses its purpose. Pairing your remote is a straightforward process and it's critical to the functionality of your Apple TV service.
Imagine turning on your Apple TV, ready to dive into your favorite series only to realize that the remote isn't working. It's frustrating and something you definitely want to avoid. So, it's important to understand how to correctly pair your remote, making your Apple TV experience as seamless as possible.
But, there's more to consider here. Did you know pairing your Apple TV with the right remote can also impact your TV's functionality and security? Misunderstandings about pairing can lead to misguided selections. Each Apple TV remote has specific features that can either enhance or limit your Apple TV experience, depending on the pairing process.
Next, the Apple TV remote features a touchpad. It's effectively a mini-computer that responds to sensors. The touchpad won't provide optimal performance if it's not paired correctly. Furthermore, the remote's accelerometer and gyroscope also attribute to its functionality. In essence, it's not just the TV you're controlling with the device. It's a sophisticated piece of technology, with its internal parts working in tandem when correctly paired.
Last, security! Even if it's difficult to believe, improper pairing can lead to security risks. Unauthorized access to your Apple TV, potential access to your iTunes account, and even security breach of your internet network are all valid concerns. By securing proper pairing, you're adding an extra layer of security and peace of mind.
With these points, the pressing question is not 'why is pairing your Apple TV remote important?' Rather, 'how could it not be?' Let's navigate further into the intricacies of the pairing process together.
Moving onto the next section, we'll explain what kinds of remotes are used with Apple TVs and how to identify the one you have...
Step 1: Check the Battery Level

Before you dive into the pairing process, check your Apple TV remote's battery level. It's an integral step, often overlooked, but holds significant importance.
To do this, head over to your Apple TV's settings. From there, navigate to > Remotes and Devices > Remote in use. On this screen, you'll spot the battery level.
We can't stress enough how critical a well-powered remote is during the pairing process. A depleted or weak battery might impact the process, leading to an unsuccessful pairing attempt. Even if you're able to pair the remote, low battery strength can cause erratic behavior or regular disconnections.
Often there are scenarios when the remote itself isn't flawed, but a drained battery creates a hurdle during the pairing process. That's why we suggest you keep your Apple TV remote charged or replace the battery if needed.
To keep the battery health in check, closely monitor the remote's actions. Look out for unresponsive buttons or a slow-reacting touchpad. They're usually the first signs of a weak battery. Don't ignore these signs, as they might lead to a degraded Apple TV experience.
While doing this step, don't rush. Take your time to ensure the remote is charged and ready. Pairing your Apple TV remote isn't just about getting it to work. It's also about maintaining the optimal performance and limiting unauthorized access to your Apple TV. So, it's wise to start on the right foot by keeping an eye on the battery level.
Remember, proper pairing not only ensures smooth navigation but also enhances your Apple TV's functionality, performance, and security. Such an important step shouldn't be limited by something as replaceable as a battery. Stay tuned to learn about the next steps in the pairing process. We're sure you'll master them in no time.
Step 2: Reset the Apple TV Remote

Sometimes, pairing issues occur due to glitches in the remote itself. That's why, before you proceed with pairing, it's crucial to reset the Apple TV remote. By doing this, you're alleviating any possible technical issue. It's like giving a "fresh start" to your remote and enhancing its chance to pair perfectly with the Apple TV.
Here's how you can reset the remote:
- Hold down both the "Menu" and "Volume Up" buttons on your remote for about five seconds.
- Keep your eyes on the Apple TV screen. A message about your remote being linked will appear.
- Wait for the process to complete. Your remote should now be reset.
It's a simple process, isn't it? But remember, you shouldn't stop here. Even after resetting, your remote may not work as expected if it's not correctly aligned with the Apple TV. Therefore, the next step includes aligning the Apple TV remote.
In the upcoming section, we'll guide you through the process of aligning your reset Apple TV Remote. There you'll understand how to correctly do it so everything works smooth. Just stay with us on this journey of seamless TV viewing experience.
Step 3: Put Apple TV into Pairing Mode

After resetting the Apple TV remote, the next move is setting the Apple TV itself into pairing mode. This crucial step ensures that your Apple TV is primed to connect with the remote.
Preparing for the Pairing Process
To move forward, ensure that your Apple TV is powered on and the home screen is visible. Turn off any wireless devices nearby that might cause interference during the pairing process.
On the Apple TV, go to Settings. Scroll down and select Remote and Devices. Under the Remote section, you'll find an option labeled Pair Apple Remote. Select it: this sets your Apple TV into pairing mode and prepares it for a new remote connection.
Remember, maintaining a close distance between your Apple TV and the remote during the pairing process gives you the best chance of a successful pairing.
Initiating the Pairing
With the Apple TV in pairing mode, it's time to bring your Apple TV Remote into action. Press and hold the Menu button and the Volume Up button on the remote simultaneously. Upon doing this, an icon should appear on your TV screen indicating a successful connection.
If this doesn't happen straight away, don't panic. For some people, it takes a couple of tries to get it right. Patience and perseverance are key to achieving success here.
Now the Apple TV and remote are communicating. However, they might need a few moments to establish a connection. This waiting period is typical: it happens as both devices sync their functions to work in harmony.
Don't forget that a strong Wi-Fi connection can also help expedite the pairing process. Ensuring a stable network will take you a step further to achieving seamless entertainment with your Apple TV.
Although this might seem like a lot to take in, remember that this is essentially a one-time setup process. Once the remote and the Apple TV are paired, you'll only need to revisit these steps if a new remote is introduced, or if you run into any major issues with the existing connection.
Thus far, you've resetted the remote, and your Apple TV is now in pairing mode. The next segment will delve into the finer details of completing the pairing process, including any potential hiccups you might face and how to troubleshoot them.
Step 4: Pairing the Remote
Now that you've checked the battery level, reset your Apple TV remote, and put your Apple TV into pairing mode, the next crucial step in this process is pairing the remote. By now, you're nearly there and just a few steps away from a successful setup.
Start by ensuring that your Apple TV is turned on and within close proximity to your remote. Distance matters during this process – keeping your remote close to your Apple TV can significantly improve the chances of a successful pairing.
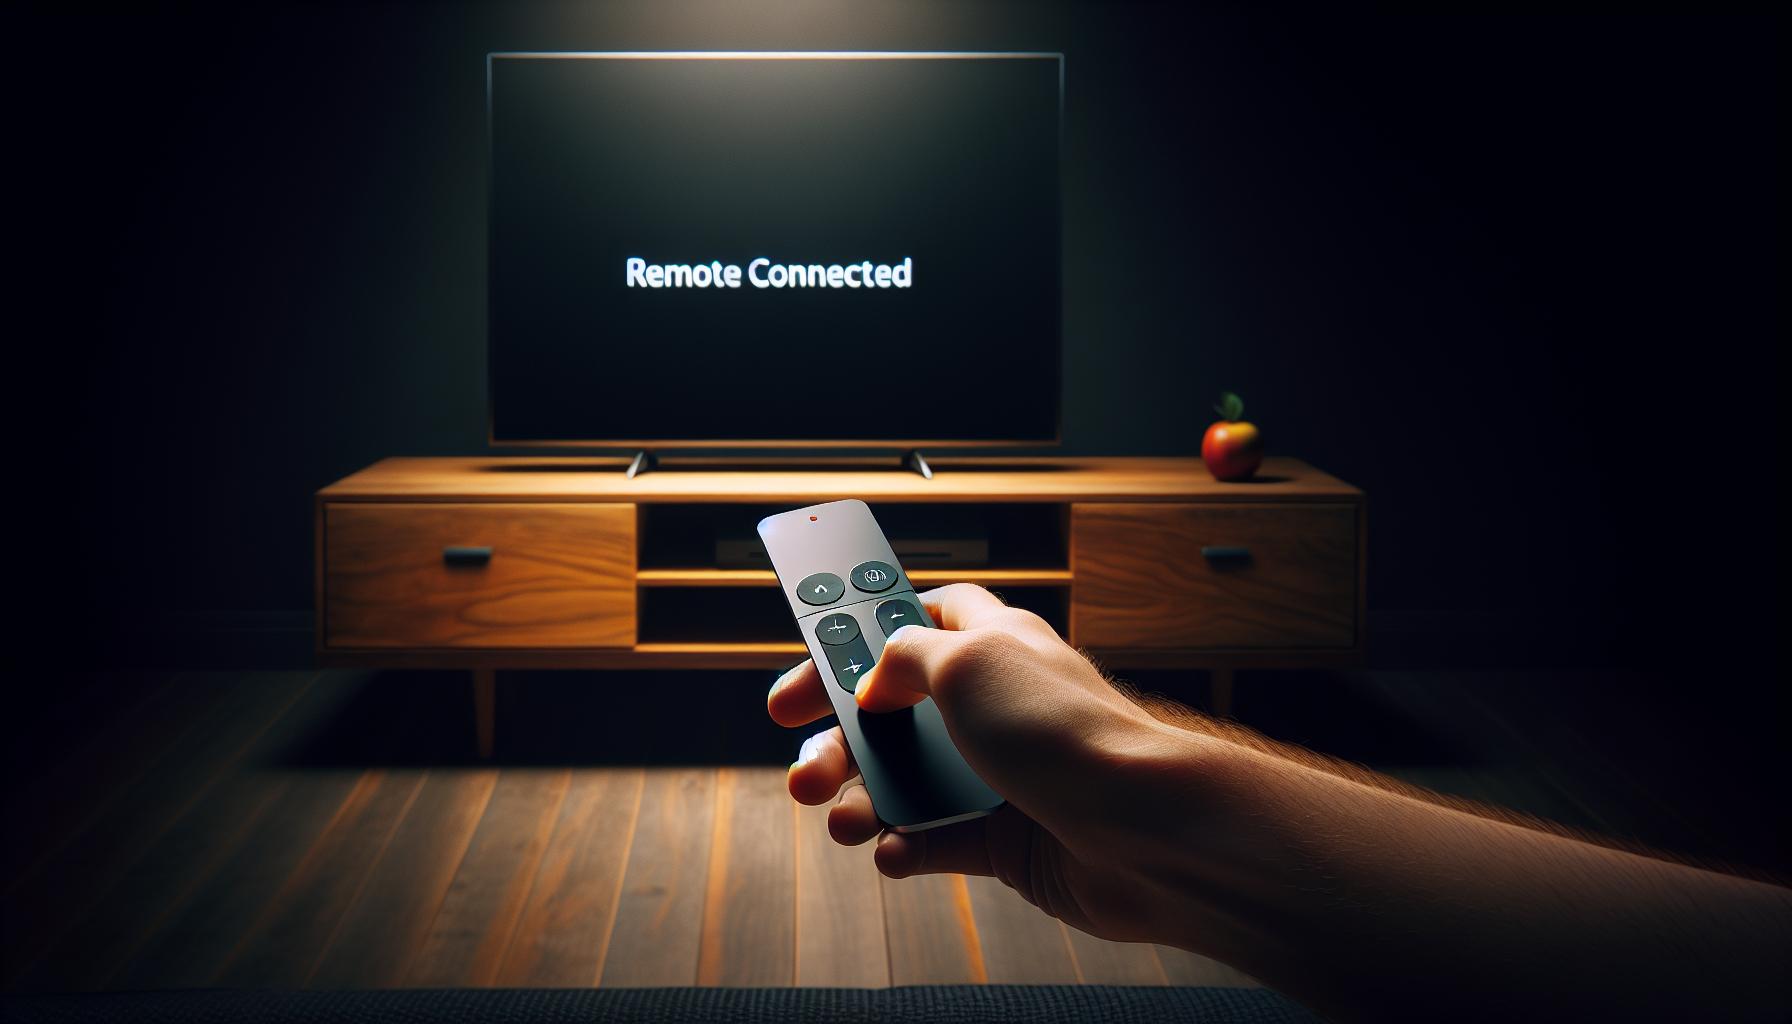
First, press and hold the Menu button and the volume Up button on your Apple TV remote simultaneously until you see a message on your TV screen that states "remote connected". What this does is create a connection between your Apple TV and remote.
Below are the common conditions to pairing your remote:
- The remote is within three inches of your Apple TV.
- Both the Apple TV and the remote are not obstructed by any physical object.
- The Apple TV is not in Sleep mode.
If these conditions are not met, it's possible that your remote may not pair successfully. So always verify these conditions before starting the pairing process.
Moreover, if interference is disrupting the pairing process, try moving your Apple TV and remote to another location, away from other electronic devices. Having a strong Wi-Fi connection can also aid in a smooth pairing process. Remember to always maintain a stable and robust connection throughout the process.
Once the pairing is successful, you'll notice the words "remote connected" on your TV screen. That's the indication that the job is done, and your remote is now paired to your Apple TV.
Following these steps will simplify your Apple TV remote pairing process and make it less of a hassle. Don't forget, whenever there are major issues with the existing connection or a new remote is introduced, revisit these steps for reconfiguration.
Step 5: Testing the Remote
After successful pairing, it’s necessary to test your remote to verify that the connection has been established correctly. Don't assume it's good to go without testing it first.
The first test to perform is the Basic Functionality Check. On your remote, press the Menu button to awaken your Apple TV if it’s asleep. Navigate the menu options by swiping or pressing the arrow buttons. Check if media can be played or paused with the Play/Pause button. If all these functions operate properly, it means the remote is in good working order.
The second part of the testing process involves Checking the Siri Function. Hold down the Siri button on your remote and make a command. Any simple command will suffice - consider asking for the weather or requesting to play a particular show or movie. If Siri responds correctly, you can be assured that this feature is functioning properly.
Sometimes, however, you may encounter issues where some buttons are unresponsive. If this happens, it’s a good idea to restart your Apple TV and remote. The process is straight forward:
- Disconnect the power on your Apple TV
- Wait about 10 seconds
- Reconnect the power, and wait for your Apple TV to boot
- Finally, test your remote once more
But there’s more! If issues persist with the remote even after the restart, consider replacing the remote's batteries. Weak batteries often cause intermittent or erratic responses from the remote.
And there you go! Perform these tests anytime you feel your remote is not operating at peak performance, or after any changes are made, including the introduction of a new remote. You’ve now learned the key steps towards ensuring a seamless user experience with your Apple TV remote. Maintain this routine, and always be ready for the ultimate Apple TV experience.
Conclusion
So, you've learned how to pair your Apple TV remote. It's a simple process, but it's important to follow each step carefully. Remember to check the battery level and reset your remote before you start. Moving your Apple TV and remote to a different location can help if you're experiencing interference. Once you've successfully paired your remote, you'll see "remote connected" on your screen. If you're introducing a new remote or facing issues with your current one, don't hesitate to revisit these steps. Testing your remote's basic and Siri functionality ensures everything is working smoothly. And don't forget, if problems persist, try restarting your Apple TV or replacing the remote's batteries. Regularly performing these tests will help you maintain a seamless user experience. Happy viewing!
Q1: How do I pair my Apple TV remote?
You can pair your Apple TV remote by placing it close to the Apple TV, checking the battery level, resetting the remote, and putting the Apple TV into pairing mode. Then, follow the on-screen instructions to complete the pairing process. The screen will display "remote connected" once the pairing is successful.
Q2: What should I do if the remote doesn't connect?
If your remote doesn't connect, consider moving the Apple TV and remote to another location to avoid possible interference. You can also double-check the battery level and reset the remote before trying to pair it again.
Q3: What steps should I follow after pairing the remote?
After pairing the remote, test it by checking the basic functionality and Siri functionality. You can restart the Apple TV and replace the remote's batteries if you encounter any problems.
Q4: How often should I perform these tests?
It's good practice to test your remote regularly to ensure a seamless user experience. If any major issues arise or a new remote is introduced, you may need to revisit the pairing and testing steps.
Q5: How do I know if the pairing is successful?
The pairing is successful when the words "remote connected" appear on the TV screen. If you do not see this message after following the pairing process, you may need to repeat the steps or consult further guidance.


