Ever felt stumped trying to open your Apple TV remote? You're not alone. This sleek, minimalist device is known for its user-friendly interface, but when it comes to changing the batteries, it can leave you scratching your head.
Why is it important to open the Apple TV remote?
You might be puzzled over why we're focusing on the seemingly simple act of opening the Apple TV remote. Here's why it's crucial.
Your Apple TV remote is a spectacular piece of technology, housing a compact design along with intuitive and user-friendly functionality. But like any gadget, it's not immune to necessities like battery replacements or occasional maintenance. To accomplish any of this, you'll need to open your remote. Without access to the interior, you can't change the batteries or troubleshoot potential issues.
On your screen, a dying battery in the remote could manifest as slow response times or jumpy cursor movements. Ignoring this can be frustrating, but even more so, it impedes the smooth user experience that Apple strives to provide. In some cases, the remote could stop functioning altogether due to expired batteries.
Our focus on the matter takes on more profound significance. It's about more than just tweaking a tiny piece of technology. It's about comfortably enjoying your downtime, watching your favorite shows without any unforeseen breaks.
In the next section, we'll discuss the safe and user-friendly steps to open the Apple TV remote. We'll demystify the process, making it less of a challenge and more a part of regular maintenance. A task as easy as changing out the batteries in any other household device.
Stay tuned to learn more about navigating this critical aspect of maintaining your Apple TV remote. Take a moment to hark back to the old adage - a stitch in time saves nine. A little effort and basic knowledge about opening your Apple TV remote could save you in the long run from an entire evening marred by technical glitches.
Tools you'll need to open the Apple TV remote

Jumping straight to the point, before getting down to business, it's important that you prepare properly. To reap success from this maintenance mission, you'll need some essential tools. Thankfully, these are not outrageously expensive or difficult to obtain. In fact, you likely have them around your household already.
First on the list is a soft cloth or microfiber towel. Yes, your Apple TV remote deserves soft handling and a gentle touch. You'll be implementing this cloth for two reasons. One, to lay your remote upon preventing any scratches or damage to its sleek look. And two, to clean the remote's surface, wiping away any dust or smudge marks.
Next up, you need a thin, non-conductive prying tool. Something like a plastic card, guitar pick, or a specially designed electronics opening tool will suffice. This tool becomes crucial in your endeavor as you'll be using it to pry open the Apple TV remote cautiously without causing internal damage.
Last but not least, meet your final companion in this quest, a small Phillips-head screwdriver. Some remotes might have tiny screws that need loosening, hence this tool is irreplaceable.
To sum things up, here are the tools you'll need:
- Soft cloth or microfiber towel for protection and cleaning.
- Thin, non-conductive prying tool for cautiously opening the remote.
- Small Phillips-head screwdriver for loosening any potential screws.
Make sure you have all these at hand before you start. Remember, proper tools are half the work. So, while these items might seem overly simple, they are instrumental in the successful opening of your Apple TV remote.
Moving on, let's dive into the actual steps you can take to open up your Apple TV remote effectively...
Step 1: Identify the type of Apple TV remote you have

Before diving headfirst into the opening process, it's crucial you identify the type of Apple TV remote you have. Apple, known for its frequent product updates and iterations, has released various versions of its remote over the years.
Two kinds of remotes are common: the Apple Siri Remote, and the traditional Apple TV remote. While they share many similarities, these devices require a slightly different approach when it comes to disassembling them. Identifying your remote type will ensure you're following the right procedure, keeping your remote safe from accidental damage.
The Traditional Apple TV Remote
Are there clickwheel-like controls on your gadget, coupled with physical 'Menu' and 'Play/Pause' buttons? It means you're holding the traditional Apple TV remote. This lightweight, silver-toned device is more straightforward to disassemble, thanks to its less complex structure.
Apple Siri Remote
On the other hand, if you're looking at a touch-sensitive panel at the top of your remote and see a 'Menu', 'TV', and 'Play/Pause' buttons below it, you have the futuristic Apple Siri Remote. It's overlooked feature until now, your remote also houses a microphone to aid with Siri interactions.
Now that you know the differences between the two prominent Apple TV remote types, it’ll be easier to follow the right opening process for your specific model.
Bear in mind that Apple constantly innovates and updates. Always ensure to check the latest television accessories from Apple if you're working with a remote from a newer model.
Step 2: Locate the battery compartment

Having identified your specific Apple TV remote model, the next action on your to-do list is to locate the battery compartment. Both the traditional Apple remote and the Siri remote have distinct battery compartments, and locating these is crucial to successfully opening your remote.
On the traditional Apple TV remote, the battery compartment is situated on the back. It's an oblong compartment, spanning almost the full length of the remote.
It's important to remember that variations between remotes can bring about different placements of compartments, so it's crucial to ensure you're aware of your remote model. Some Apple remotes may have a small compartment cover you'll need to slide out of the way. Carefully watch out for these specifics on your remote.
In contrast, the Siri Remote has its battery fixed inside, making it a bit more complex to access. Despite this, it's still possible to locate and access the battery site in the Siri Remote. You'll have to unfasten the screws to get to the battery.
Once you're sure you have located the battery compartment, keep your screws in a secure place if your remote has any. Do not rush this process. It's easy to lose these tiny parts, and you'll need them for reassembling your remote after your maintenance is done.
| Remote Model | Back-compartment | Screw-loosening |
|---|---|---|
| Traditional | ✓ | × |
| Siri | × | ✓ |
Granted, locating the battery compartment may prove to be a slightly challenging task if you aren't accustomed to it. But no worries. You're on the right path. Your remote is a small piece of advanced technology, and treating it as such will get you through the process without any hitches. Now, onto disassembling the remote...
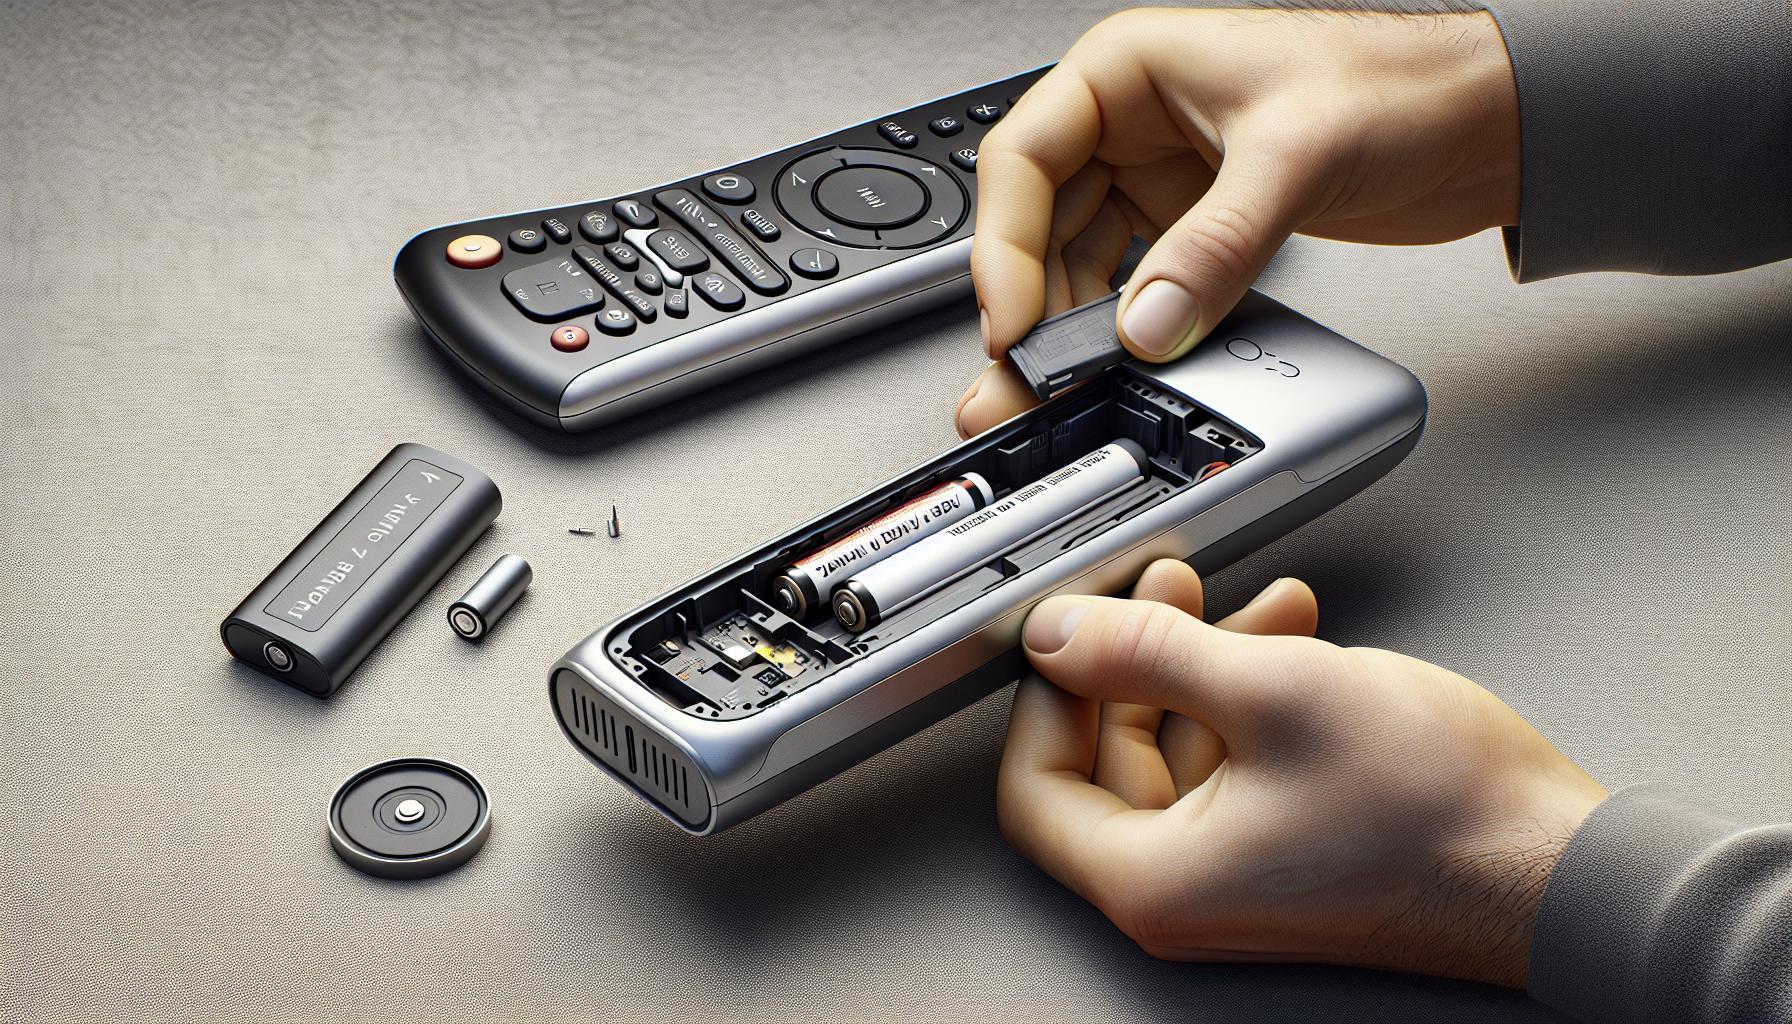
Step 3: Open the battery compartment

With the battery compartments of your Apple TV remote or your Siri remote successfully located, it's now time to carefully open them up.
If you're dealing with the traditional Apple TV remote, flipping it so its back faces upwards will give you a clear view of the battery compartment. You'll simply need a coin to open it up. Insert the edge of the coin into the small groove on the compartment's panel, twisting it slightly. This will pop the panel off, providing direct access to the battery.
On the other hand, if you're using the Siri remote, additional steps need to be taken. This remote uses tiny screws to secure the battery compartment. To open it, you'll need a small screwdriver (ideally a 1.5-2.0 mm). This Screwdriver Size is suitable for iPhone repairs also, and is readily available from electronic stores or online marketplaces.
| Remote Type | Required Tool | Tool Size |
|---|---|---|
| Apple TV Remote | Coin | N/A |
| Siri Remote | Screwdriver | 1.5-2.0 mm |
Proceed by gently unscrewing the two screws at the bottom of the remote (one on each side). Remember to be gentle and patient during this step. You do not want to strip the screws or lose them. Once you've successfully removed the screws, slide the outer shell down to reveal the battery compartment.
Remember: Slow and steady is the key here. Screws and panels are small, easily lost components. It's recommended to carry out these steps on a flat, clean surface so that you can secure these tiny components and avoid their misplacement.
This step may require a bit more technical skill, especially when dealing with the Siri remote. But with patience and precision, you'll have your Apple TV or Siri remote open, ready for a battery replacement in no time. Stay tuned for our next article, where we guide you on Step 4: Replacing the battery.
Step 4: Replace the batteries
Following our previous sections, you've now successfully opened the battery compartment of your Apple TV remote. This new section will guide you through the process of replacing the batteries in both the traditional Apple TV remote and the Siri remote.
Firstly, with the traditional Apple TV remote, you'll start by observing the battery compartment. Here, you'll notice a small crevice that fits directly into the back of an AAA battery. Simply pickup the new batteries and align the plus (+) and minus (-) signs on the battery with the matching signs on the battery compartment. Carefully insert the battery, ensuring it fits snugly.
With the Siri remote, the battery replacement process might be a bit different compared to the traditional Apple TV remote. The Siri remote uses a rechargeable battery, so instead, you'll need to plug it into a power source using the Lightning to USB cable. Plug one end of the cable into the Lightning connector on the remote, and the other end into the USB port of your computer, a power adapter, or directly into the Apple TV if there is a USB port available.
During this process, it's important to be aware that mishandling the batteries can cause them to rupture or leak, which in turn can damage your remote. Being patient and careful is key in successfully replacing your remote’s batteries and ensuring its long-term functionality.
Note: Always recycle your used batteries responsibly.
With your new or charged battery in place, you're now ready for the fifth step - Closing the battery compartment. But, that's a tale for our upcoming section. Stay tuned for more.
Step 5: Close the battery compartment
After you've successfully swapped out the old batteries for the new ones, you'll find yourself at the second to last step - closing the battery compartment. This step should be as seamless as removing it if you've been patient and gentle during the previous steps of the process.
Firstly, make sure to go over the battery alignment once again. To keep your Apple TV remote functioning efficiently, it's critical to keep the plus (+) and minus (-) signs on the battery and the remote aligned. If the batteries have been placed incorrectly, the remote won't work and you'll have to open the compartment again.
Let's tackle the actual process of closing the battery compartment. For the traditional Apple TV remote, hold the remote upside down and place the battery compartment cover over the compartment. Make sure that the cover is in align with the case. Then, delicately slide the cover into place. It should fit neatly without resistance.
When it comes to the Siri remote, there isn't a compartment to be closed as the battery isn't replaceable. So, pat yourself on the back for demonstrating your tech abilities by recharging it properly!
Quick recap for traditional remote:
- Check battery alignment
- Hold remote upside down
- Place cover over compartment
- Slide the cover into place
In all steps, whether opening, changing batteries, or closing, remember to handle the remote with proper care. It's not only about getting the remote to work, but also preventing any potential damage to these delicate pieces of technology. Top-notch performance can be best guaranteed when devices are well taken care of. As you continue on to the next steps, keep in mind what you've already learned about battery replacement. Don't rush, take your time and success is sure to follow.
Troubleshooting tips if you can't open the Apple TV remote

While opening your Apple TV remote to replace batteries is usually a straightforward process, there may be times when the task seems near impossible. Don't despair—in this section, we'll discuss some tips and tricks to help you out in such scenarios.
First off, it's critical to ensure you're applying pressure in the right place. For the traditional Apple TV remote, you'll need to press down on the battery compartment's door and then slide it towards the top of the remote. The process for the Siri remote is a bit different, and it's important to note that it uses a rechargeable battery that isn't designed to be user-replaced.
In case the compartment door on your traditional remote refuses to budge, applying a bit more force might do the trick. However, remember, you want to avoid damaging your remote, so use firm, controlled pressure rather than resorting to brute force.
If you're still having difficulty, check to see if there's any visible debris stuck around the battery compartment. A simple blow of compressed air might clear the path.
For those with a Siri remote, if the battery isn't charging or holding a charge, your issue likely resides in the battery itself or the charging cord or brick. Try using another Apple-certified Lightning cord and adapter, and see if the problem persists.
The steps above should help address the most common issues you'll run into when trying to open your Apple TV remote. But remember, if all else fails, it might be time to seek professional assistance or consider purchasing a new remote. Navigating through the troubleshooting process requires patience and attention to detail, so stay calm and carry on.
Conclusion
You've now got the know-how to open your Apple TV remote and replace its batteries. Whether it's the traditional model or the Siri remote, you're equipped with the steps and troubleshooting tips to handle it all. Remember, patience and care are key to avoid any damage. So next time your Apple TV remote runs out of juice, don't fret. You've got the skills to get it back up and running in no time. Keep this guide handy for a smooth, hassle-free battery replacement process.
Frequently Asked Questions
Q1: How do you open an Apple TV remote?
The article provides a detailed step-wise procedure. Essentially, you flip your traditional Apple TV remote and press the battery component down to slide it out. For a Siri remote, you find the circular compartment at the back and turn it counterclockwise.
Q2: How do I replace batteries in my Apple TV Remote?
Replace batteries by sliding out the battery compartment in your traditional remote and inserting fresh ones. In a Siri remote, turn the circular compartment counterclockwise, remove the spent battery, and input a new one.
Q3: What do I do if I can't open my Apple TV remote?
The article covers troubleshooting steps extensively. Consider applying more pressure, check if there's debris blocking the way, or it may be a specific issue with the Siri remote battery.
Q4: Why is caution emphasized while replacing the Apple TV remote batteries?
The remote could be damaged during the battery replacement process. It's crucial to be patient and cautious while applying pressure or inserting new batteries to avoid any harm to the electronic components.


